Batik ~ How and Why:
Doing Batik was an unique and fun experience! I had no prior experience of it (or anything like it, apart from silk maybe; the idea of tracing your designs with gutta is a little similar in how batik uses wax to trace its designs.) Sadly the Batik i did at the workshop – is not really something I can do at home (maybe in the future however I will look at doing some more batik pieces now I am more familiarised with it, and the process.)
I really wanted to try doing this because: I’m curious how its done, what I can learn from it. And I’m interested in it’s history/cultural significance.
Step 1 – Tracing the design in wax.

– When we arrived, the designs for our first batik pieces had already been drawn. (In hindsight I don’t think that this was strictly necessary as they were just sketching a picture for us to trace. I think it was however good to try do a more local/traditional picture, one of their choosing.We used melted wax to trace our designs (they had a mini gas burner with a tin to melt the wax in.) We used Paraffin wax. And he said that you have to use 100% cotton for the colours to work

Step 2 – Getting ready for the dyeing.
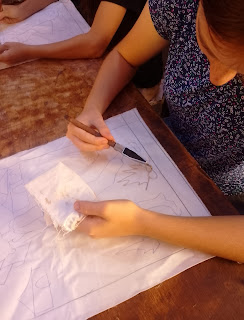
I chose to leave my background on the batik white (there is a step you can do later to make lines/almost a streak effect across the white.) In order to make sure none of the dye penetrates the background, I had to paint two layers of wax on the parts I wanted white.
(see the picture below)
–
Here is a picture of the ‘waxpen’ I used. Its not the “standard” bowl shape.
The artists locally make their pens instead of just importing them!

Notes about painting with wax and using the pens:
Painting with wax was quite a new experience! Its obviously been melted down. It is quite drippy! It dries fast and spreads on the fabric quickly. The person who was teaching us was helpful and instructive on the best ways to paint with wax. One of the tricks was to do it quite quickly with firm strokes, you do not really want to mix the wax around a lot as it dry quickly and can make a mess as well as leaving a mark on your final piece. Likewise using the Batik pen, i found that it was not good to fill it all the way up with wax. Because it can spill easily! which you do not want because it will leave white spots on your finished piece. It was an exercise on keeping a steady hand, you want to do thin, smooth lines. When the wax starts to come out slower, holding the pen in the hot pot of wax makes the wax soft again and it comes out easily.
Here is my first batik piece, ready to start dyeing! you will notice brush marks on the trousers.. these were to make sure there could be 2 colours blended to make it more interesting!
Step 3: Dyeing – the first colour orange!

– They had already decided colours for us to do previously… Orange, red and black.
The first Colour we dyed onto the cotton was orange. He said you generally wanted to start with the lighter colours. Because it wouldn’t of worked to dye the red first, and then try do orange on top of that.
Here is some information our instructor gave us on the dyes: The dyes are powdered and artificial from Nigeria; they are mixed with sodium hydroxide mixed with hydro-fix to fix the colours.
They basically make chemical reactions with the dyes and sodium hydroxide to make the colours fix.

– We watched the colours being mixed, It was quite smelly due to the chemical reactions going on! Through experience our teacher was able to get the right quantities. Without strictly measuring it. He added that, if there were no bubbles when the colour was mixed, it wouldn’t work.

We then put gloves on and immersed the fabric in the dye. After
plunging them in a little, we took them out and hung them up to dry.
Below mine is the 2nd to the right…
Continuing the Dyeing – Red
Once the orange had dried (It dried quite fast!) we then took it back inside. In order to preserve the orange colour we had to paint wax on top of the areas we wanted to stay orange.

– My sister and I both decided we wanted red skies, so we
didn’t cover the sky in wax. Rather now it was just choosing what
objects/clothing we wanted red.
(Though happily everything isn’t just in
block colours you can have two colours on one object by partially
covering the bits you want to be a different colour in wax)


We then dyed the next colour red. –
Only one more colour to go! When the pieces dry in the sun, it really makes the colour come out!
– Again repeating the steps of painting wax over the areas we want to stay red.

– Now the whole piece is pretty much covered in wax, all that remains to be dyed black is the skin, the tops, and the doors of the huts. And finally the border!
-Before dyeing the black, I started cracking (rolling it up, so there are lines)the wax which is covering the ground. As I mentioned previously the ground is remaining white. So now there will be this line effect across the white. And lastly to sign my name at the bottom!

– We actually waited to dye this so that my second piece, which also has black in it could be dyed at the same time. So both pieces were revealed at the same time!
2nd Batik Piece ~
I explained a little at the beginning about the process of what i was doing. Here I shall attempt to be a little more brief. . .
I designed quite a simple piece, – it is meant to be a kind of Safari Landscape. In hindsight I think I might have been a little more elaborate. But I did this before I really knew how it would turn out. I was concerned that it would be harder to make a more complicated design come through well. So I was trying to go for “Simple but effective” I admit now it seems a little too simple to me. But overall I am pleased with the result.

– Tracing the designs… (I did not do a border.)
In the background you can see some of the great pieces they have done! The scenes they tend to stick to are: African life style/culture and stories, and village life. For example the lady riding the horse she is a warrior princess and part of their history and story culture.

– The colours used in this piece were, bblue, red and black (The red and black can be mixed somewhat, to create a purplish colour). There is only so many colours you can do on one piece. So you have to be flexible! My brother and two sisters also did this course, so we had to decide on three colours that would work for all of us.

– Here design has been traced, I chose to do the ground white again as you can see it has been covered in two layers of wax. The two parts I leave blue in this are the river and the sky. When it was finished the blue wasn’t actually this bright. It darkened a bit, and almost had a purplish tint to it.

– Here the sky and the river, have been covered in two layers of wax. To keep the blue colour.

Here the red has already been dyed. I am painting over the areas i want to remain red. And very lightly going over areas i want to have mixed colours.

Cracking the wax.


Once both pieces had been dyed black and dried. The next step was to wash off all of the wax, to see what lies underneath! We dunked the pieces in boiling water first. And then rinsed the pieces in cold water, and scrubbed off any wax which still remained. Now for these to dry and then they are finished!
Drying on the Line, they look so bright!

We then Ironed the pieces, and trimmed the edges with some scissors. Cutting off any fraying threads.


All the white specks on this one, are places where I had various accidents with wax! After going through this whole process it definitely made you look at the pieces hanging in the shop with new eyes. These Artisans really know their trade.
Reflection & Observations ~
I enjoyed learning to do Batik, But I didn’t really find it as enjoyable as silk painting, or the other workshops I did. I think the main reasons why I didn’t find it as fun was that, by the time I was in the midst of making it; it did not feel like I was creating an Art piece any-more. It didn’t feel immersed in creating but was sidetracked by the process and steps. (probably because there was a decent bit of waiting time in between steps), more like I was just following a set procedure. There were certain steps I enjoyed more than others, but overall I think Batik didn’t feel very creative to me.
I think “Formula art” is still a big thing among local African artists. Where you have this set procedure you always follow, and the same general design you always make. Artists do experiment, just a lot less than in the west. I think it has to do though with its heritage, these Batik artists are preserving and continuing the same procedure and skills that their fathers/relatives taught them. In doing so they are keeping their history, and stories alive. In fact the man who taught us Batik, has taken his nephew as an apprentice to teach him, and keep the skill in the family. I’m glad I did Batik, and I can’t wait to do the next workshop.
Leave a Reply