Koko Donda, Tie Dyeing ~
The last workshop that I did was Koko Donda (sometimes called Koko Dunda).This time the person teaching me was a girl, who had recently just learnt it herself;in order to set up her business. She actually was mostly self taught, watching videos on-line, and asking others for advice. She takes orders dyeing the different designs people want on cloth, and then selling it.
Koko donda is basically the African version of tie-dyeing. Only it uses materials that are avaliable here. It actually uses the same dyes as Batik. (So artificial powdered dyes which are first mixed with some caustic acid and sodium carbonate, then hot water is poured in.)

– First was to get the fabric (We used cotton 1.5 M pieces) ready for applying the dye. We learnt 5 patterns, I personally only did one. But I helped with the other designs, and I know how to do them as well.
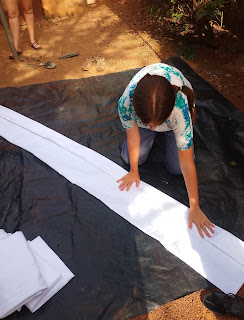
The pattern you want, your final piece of cloth to have depends on how you fold/tie/arrange the fabric before dyeing it. The folding method I’m doing in this picture is one for essentially creating lots of little boxes. After folding it horizontally like a paper fan. We then folded vertically till the fabric was in a little parcel size, we then secured it with string for dyeing.

The pattern I chose was literally called “salad” because of the wrinkly salad like pattern it has when finished.
I chose this because it looked like a visually fun design, and I
like how the end result has more of a blended soft effect, than the other patterns which
were more rigid with lines. (She showed us sample end results.)

To do this pattern we first got the
material wet, not very wet, but damp. So that it would stay in its
position. Then the technique basically involved lightly bunching up the
material pulling it towards yourself. So that it would stay in its position. You didn’t want to make big ridges, or be too rough otherwise your pattern will come out a little smudged.

I chose blue and green for my two colours. Here is the fabric with both of the dyes poured on. We used a plastic kettle to pour on the dye. And you basically just sprinkle it over the fabric. I poured the blue dye on first, then the green.


The finished results! After pouring on the dye, we let it sit for about 10 mins, the dye doesn’t take very long to set. Then we rinsed them off in water, and hung them up to dry!
I am quite pleased with the results! I love how the green and blue blend together, it makes me think of the ocean. And the colours are lovely and bright. I was just as pleased with these results, as the Batik and Natural dyeing. It still felt just as rewarding, and with a shorter process too. Rather
than leaving this as one piece, I’m going to have some clothes made out
of it. African art is after all artisanal/applied art, and meant to be
used.
Going Forward ~
Koko Donda is something that I am definitely looking forward to doing more of. It will be fun to experiment with, and try different patterns. I can easily get the materials for this, and do it at home. Unlike all the other workshops so far. It would also be a fun thing to do with other people. You can do lots of things with the dyed material, such as tablecloths, clothes, and bags; and much more besides!
Leave a Reply